

To start recording a track, simply press the New Recording button, press the plus button and the recording starts.
To stop the recording, simply press the stop button. The track will be saved in your Track list, which you can access in the Main Menu under My Tracks.
If you wish to resume an existing recording of a track, press the Resume Button in the Track Recording menu.
You can find all your tracks in the “Track List” menu. To open the track list, just tap the button in the upper right corner. You can filter the tracks by criteria like My Tracks, Favorites, Import, Shared.
You can change the map orientation so that up points North or the direction of travel. To change the orientation tap on the navigation arrow in the lower left side of the screen.
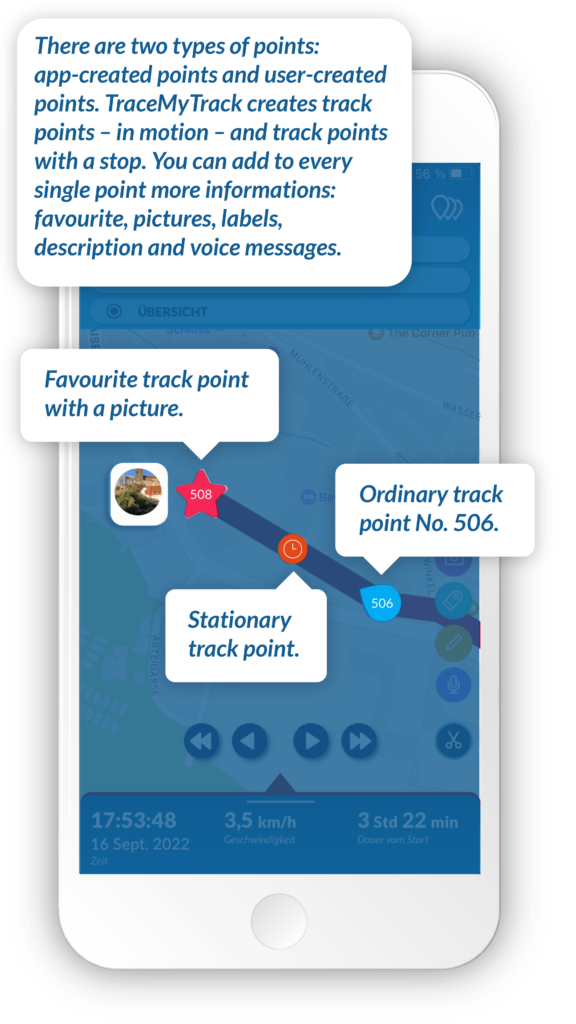
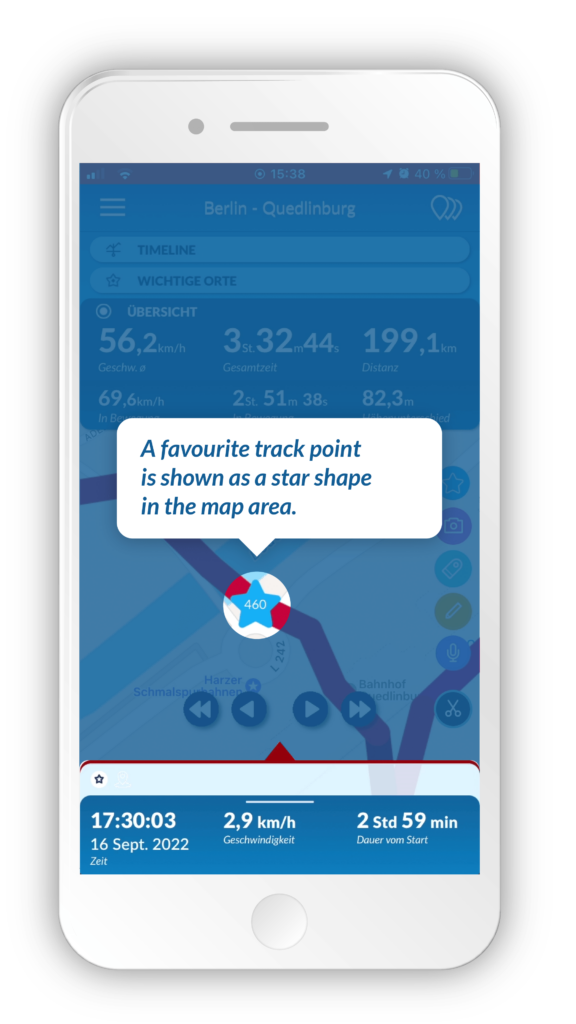
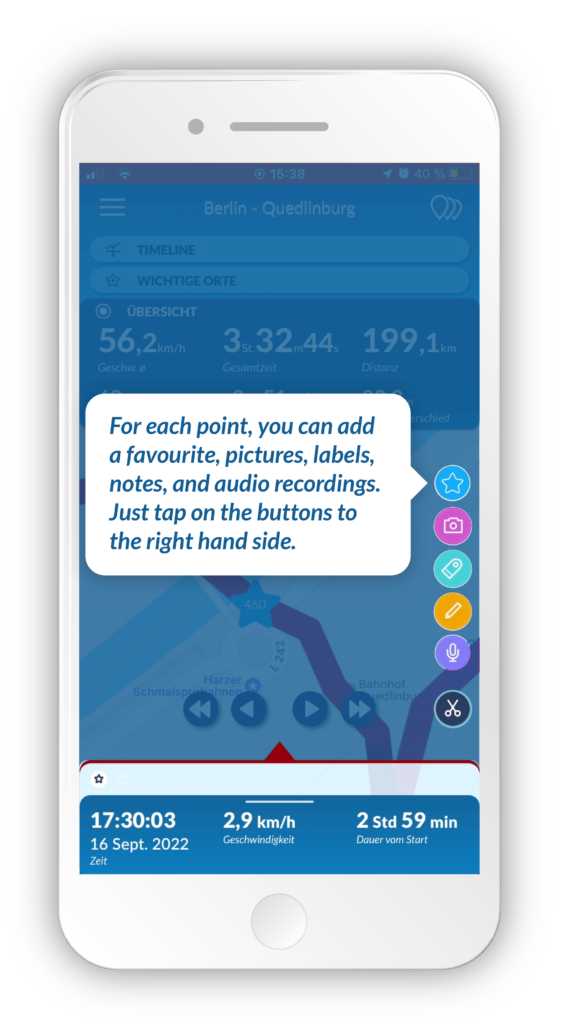
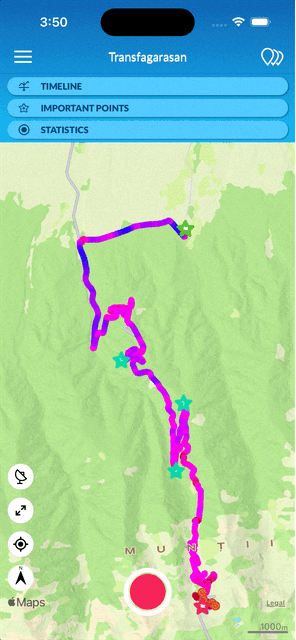
A favorite point is any point on the track that was either favorited while the track was active, or was marked favorite after the track recording finished. Any point on the track can become favorite after an image, video, voice memo, tag, description or an address was added to it and can be un-favorited if all point details are erased. A favorite point will be star-shaped and will take the colors and the attributes of the point it previously was.
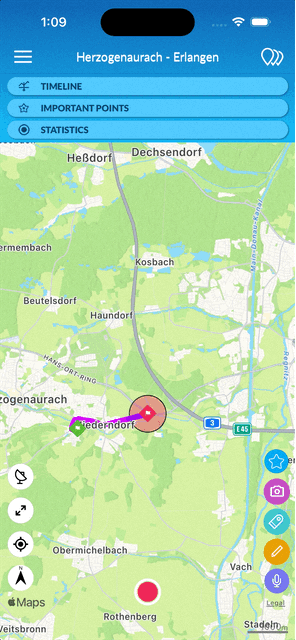
In order to see the stationary point statistics (Arrival time, Departure time, Time from start, Distance from start, Altitude and Height change since start), you need to select a stationary point first. On the bottom of the screen, the three statistics panels will show up in darker blue.
If, while recording a track, you suddenly find a great spot that you want to immediately mark as a favorite, tap the “Mark as Favorite” icon in the lower right corner of the map, which is marked with a symbol made of a star. This will mark the current point as a favorite. In case you have marked a previous point, this point will be marked as a favorite.
Photo
In order to add a photo to a point, tap on the point on the map that you need to attach the photo to and choose the Add Photo icon from the row of point information icons. A pop-up menu will allow you to either Take a photo or Add photos from library. As soon as you have taken a photo or added one or more from the library, it/they will show up in the photo field in the point details.
Video
Adding a video is similar to adding a photo, the only real difference is how the video is associated with the track points after the video is added. Since videos are not instant, TraceMyTrack will try to associate your video with multiple locations depending on the video duration, but it will always follow some simple rules:
– if you capture a new video or add a video which was recorded at the same time as the selected point, the video will be associated with the selected point and all next points which were captured during the duration of the video. TraceMyTrack will highlight this track line section for you, and also mark the video beginning and end point with a special icon.
– if you add a video which was not recorded at the same time as the selcted point, the video will only be associated with the selected point.
If you wish to delete a photo or a video from a point, you need to first select the targeted point on the map/track. The point details will appear in the lower half or the screen. Long press on the photo/video you wish to delete. An x button will show up in the lower right corner of the photo/video. Tap on the x button and the photo/video will be deleted.
The only difference between deleting a video and deleting a photo is that when you delete a video, the video will also be deleted from the rest of the points in the current track which may contain this video.
If you want to add tags to a point, first you need to select the targeted point. Choose the Add Tags icon from the row of point information icons. A pop-up list of tags will show up and you may choose, one by one, the tags that you are interested in. If you wish to add a new tag, tap on the + button at the top right corner of the pop-up window and type in the new tag within the pop-up New Tag window.
If you wish to delete tags from a point, whether you are in the preview or the full-view edit point mode, hold a long tap on the tag field and an x button will show up in the top right corner of each tag. Delete the targeted tags and exit the edit state by tapping on the tick icon on the left side of the field.
If you want to add description to a point, first you need to select the targeted point. If you are in the preview mode, by tapping on the Add description icon in the edit point icons at the top of the edit point details, you trigger a pop-up window that allows you to type in the desired description. Tap Ok and the description will appear in the description field of the edit point details. In the full-view mode, you can add a description by typing it directly in the Add description field.
If you wish to delete description from a point, whether you are in the preview or the full-view edit point mode, hold a long tap on the description field and an x button will show up in the lower right corner of the field. By tapping on the x button, the description will be completely erased.
Select the point where you want to add the voice memo. Then tap on the microphone icon in the lower right side of the screen. Finally tap on “Start Recording”.
First select a point which has a voice memo, then expand the point information by dragging the panel up. Tap on the voice memo to start the playback.

First select a point which has a voice memo, then expand the point information by dragging the panel up. Longpress on the voice memo until the “delete” button appears.
![]()
You can create a favorite point which has a custom icon, or you can change the icon of a previously placed favorite point by selecting the point and then longpress on the “star” button on the right side of the screen. A list with most recently used icons will pop up, just tap on the icon you want, or tap on the “plus” button to add a new icon from the emoji keyboard.
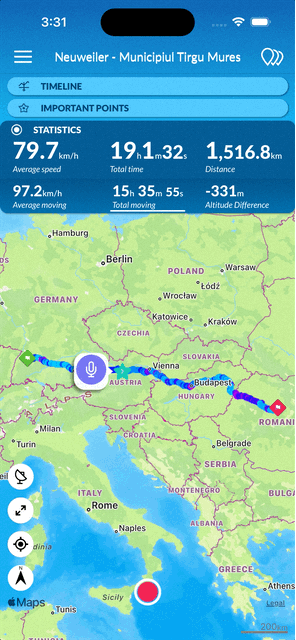
Select the point by tapping on it, then tap on the purple “globe” button in the bottom left corner.
To delete a point, select the point and then tap the scissors icon on the right to display various point editing options. Select Delete to delete the track.
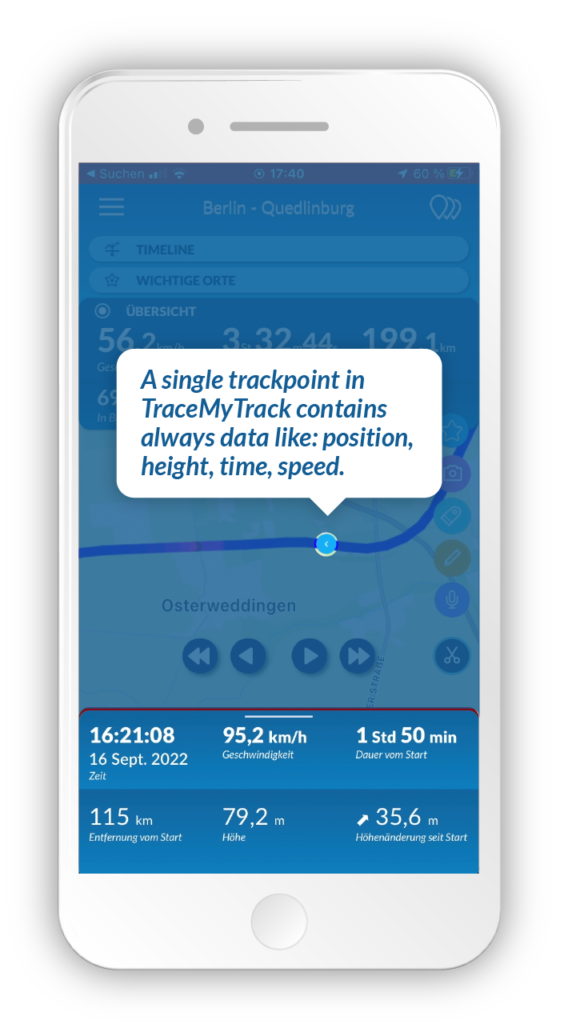
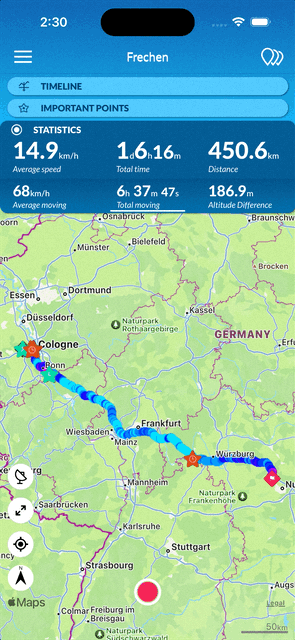
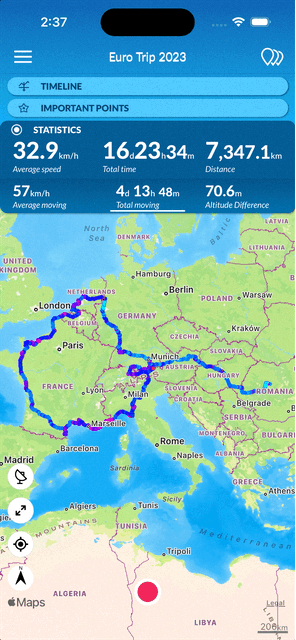
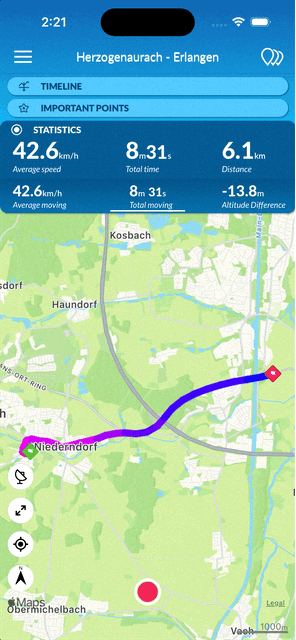
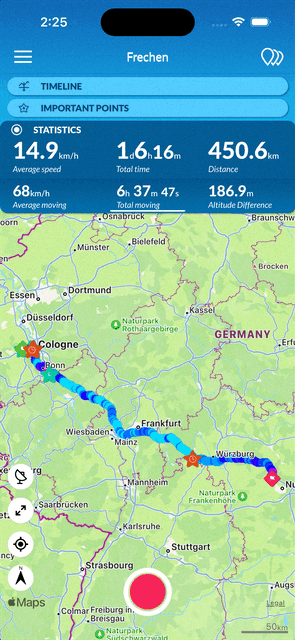
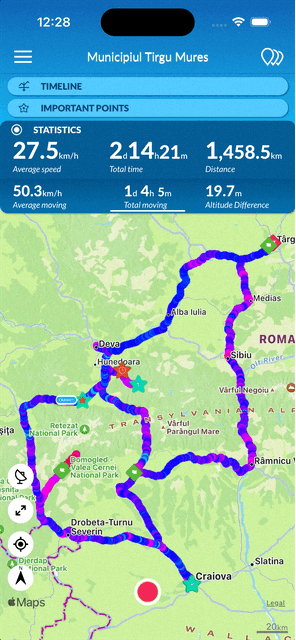
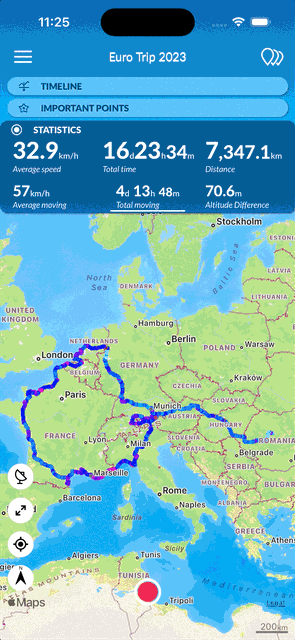
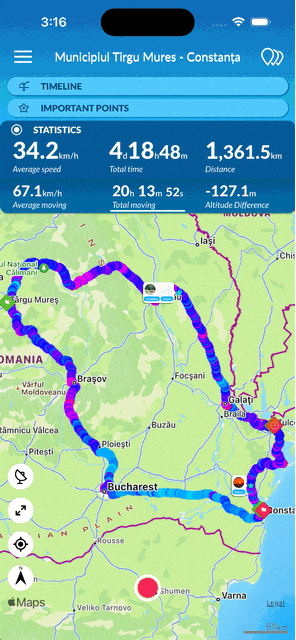
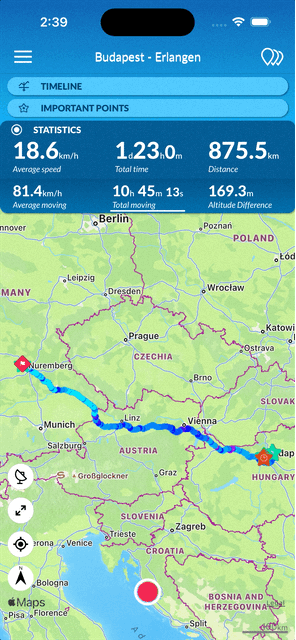
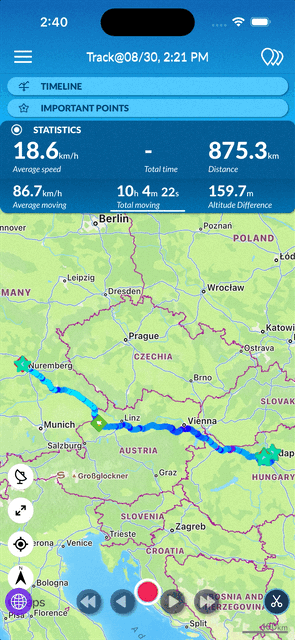
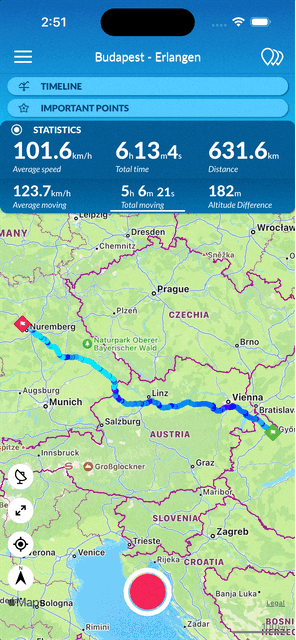
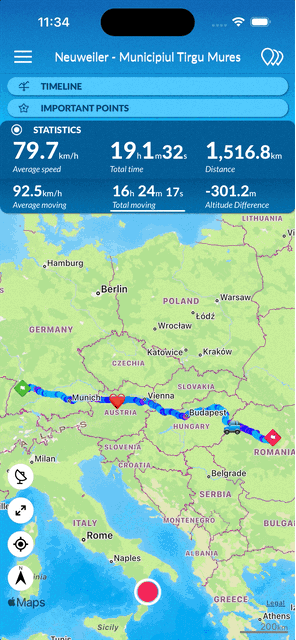
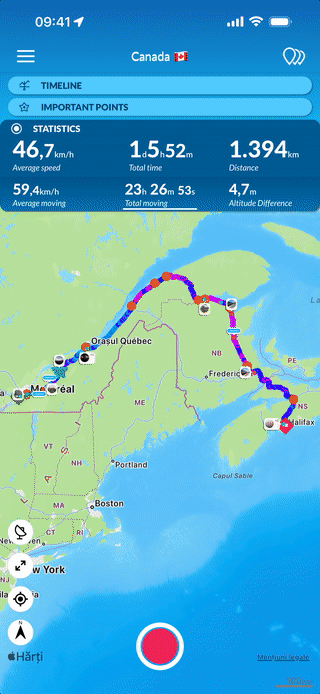
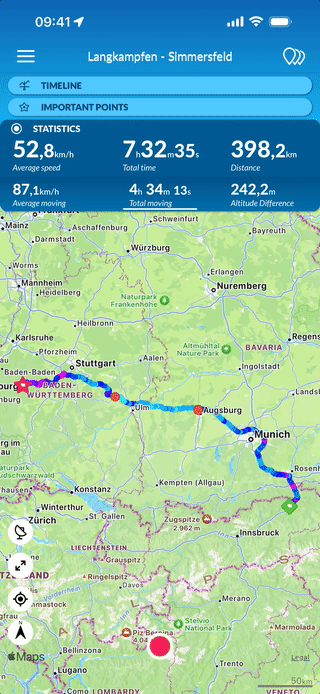
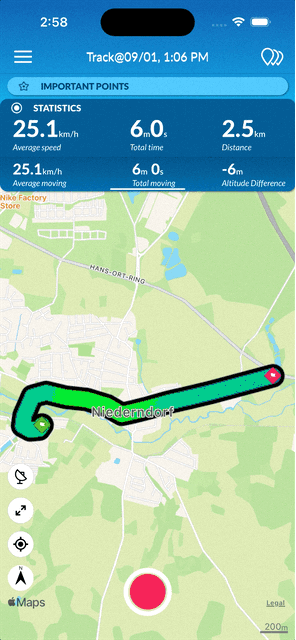
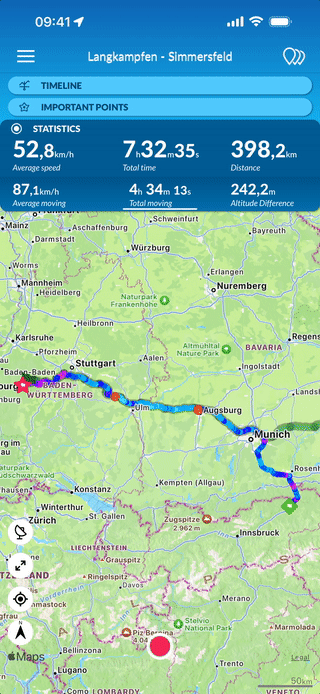
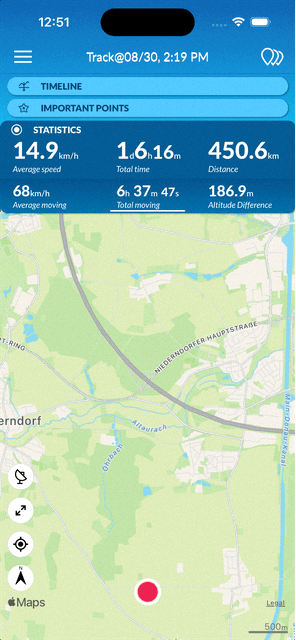
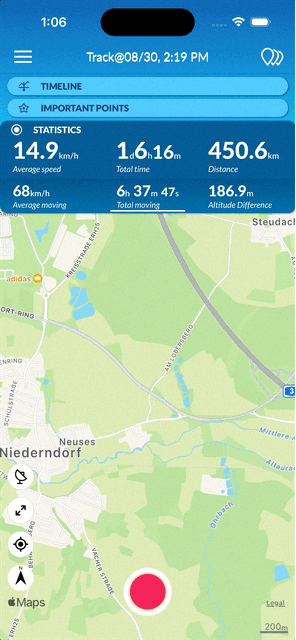
The main screen of the app will display by default the first two statistics panel for each track. If you wish to see more statistics, toggle down more statistics panels by tapping on the lower panel on the screen.
You can quickly find the point which had the track top speed or lowest/highest altitude by opening the statistics panel and then tapping on any of these three statistics.
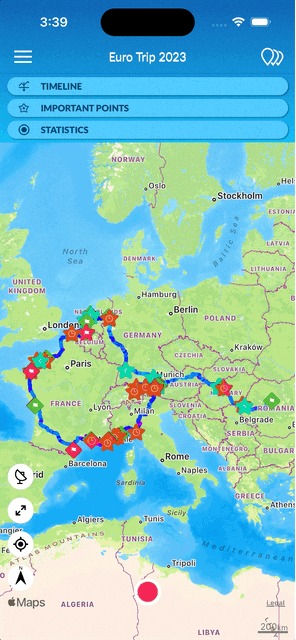
The tab “Important points” shows all points where you have stayed longer and all points with a favorite.
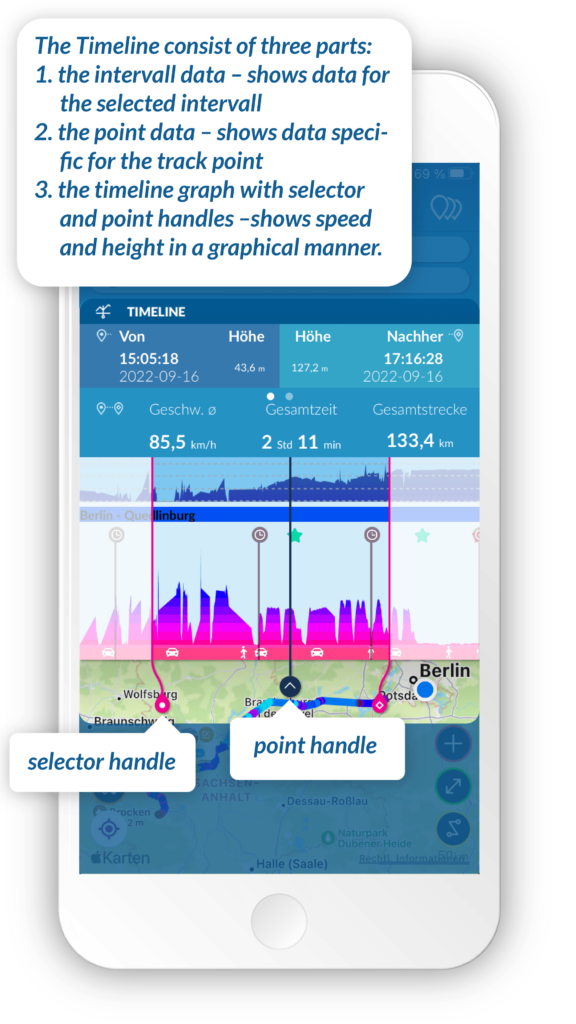
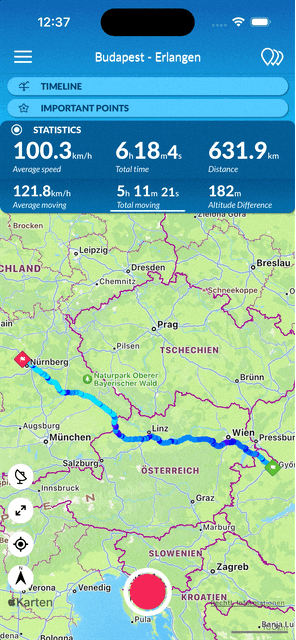
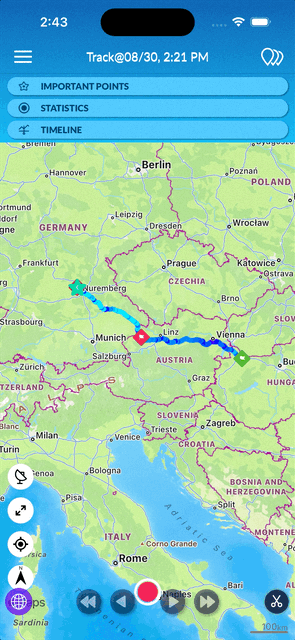
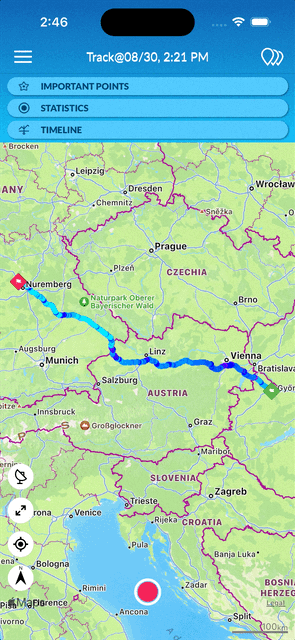
Timeline displays altitude/speed and other data over time.
To open or close the Timeline & Graph, tap on top, on the symbol or the track name.
Timeline & Graph is a great tool to visualize and analyze tracks or sections of a track.
When navigating the track in “Timeline mode” if you tap on the lower left button, TraceMyTrack will automatically split the track into continuous sections. In this case a section is an uninterrupted track portion. A section ends either when the track itself ends or when the track line goes off the screen. On the other hand, a section starts when the track itself starts or at the first point of the track that comes into view after the track line went off screen.
In tracks list all tracks have a “star” icon in the top right corner. You can mark/unmark any track as favorite by tapping on the star icon.
To view all favorite tracks inside current tracks list tap on the “favorites filter” represented by the upper left star icon.
To open the track properties of the currently opened track, open the Main Menu and tap on “Track properties”. Here you can view and set different properties for a track. You can change the track name, tags, description…etc
To delete a track open the Tracks List and swipe on the track you want to delete from right to left.
When you open the Track list at the top you can switch between multiple lists (for example: My tracks, Imported Tracks, Guide Tracks… etc). You can filter to see only the favorite tracks in each list by tapping on the “favorites” button.
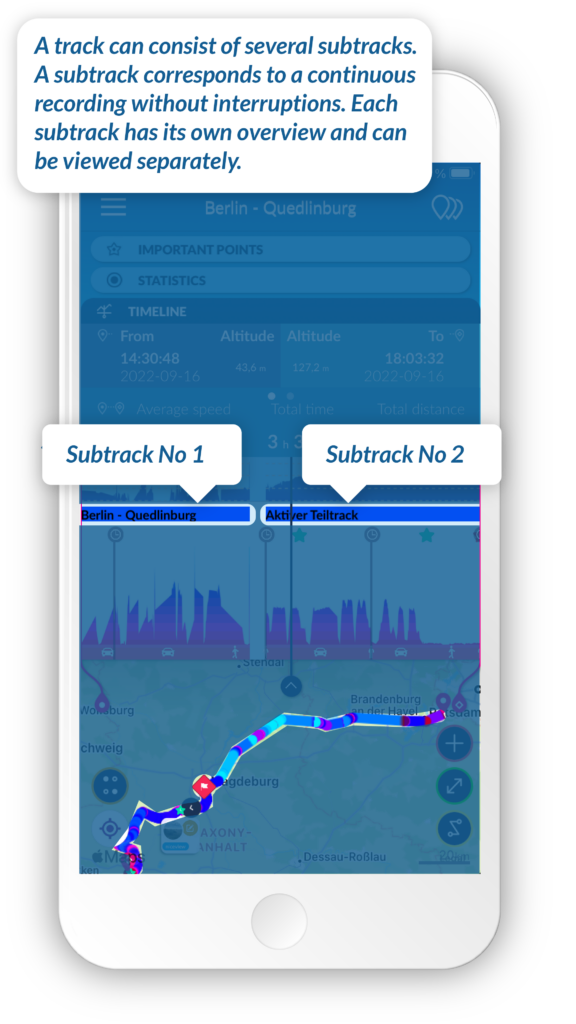
A track can consist of several subtracks. A subtrack corresponds to a continuous recording without interruptions. Each subtrack has its own overview and can be viewed separately.
By continuing a track after a stop, a new subtrack is created. In the track list, the subtrack can be expanded and be viewed separately by selection. A subtrack can also be created by splitting a point, in which case the track or subtrack is divided into two subtracks. To do this, select the point where you want to split, then tap the “Scissors” icon and select Split from the menu. After that you can choose if the selected point should belong to the previous or to the next track. With “Split” the division takes place.
Open the Track List and locate the subtrack you want to convert. Longpress on the subtrack and drag it over “Create track”. The subtrack will be removed from it’s parent track and it will appear as a new track at the top of the tracks list.
You can convert any track or subtrack into a guide. Open tracks list, longpress on the desired track/subtrack and drag it over “Create guide track”.
You can view all your guide tracks by selecting “Guide tracks” list at the top.
To delete a subtrack open the Tracks List and expand the track so that its subtracks are displayed, then swipe on the subtrack you want to delete from right to left.
Only tracks which have multiple subtracks can be expanded.
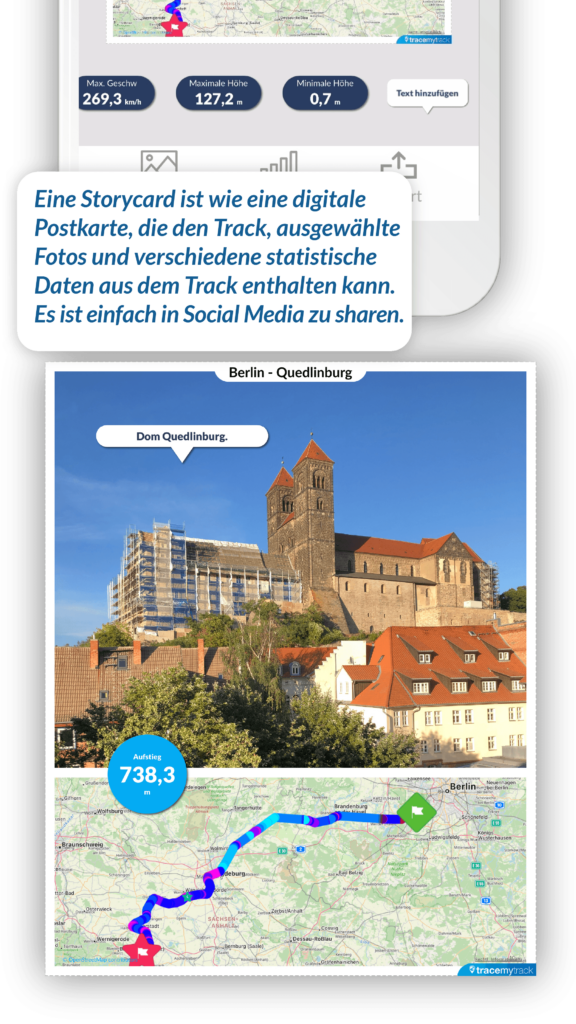
A storycard consists of one, or more images of the track, the map section and several statistical data points. You can easily and quickly create them yourself.
Go to the Main Menu and tap the Share Track as Story Map option. Follow the steps in the Share Story section and add the address, statistics and map format you want to share. Choose the way you want to share your map by tapping the Share Story Card button.
To add a text bubble all you need to do is tap on the “Statistics tab” and then drag an drop the text bubble on the storycard. You can reposition or delete it later if you want. Tapping on the text bubble will allow you to edit the text.
You can edit the title by tapping on it.
If you want to increase the photos or the map portion of the storycard you can easily do this by dragging the middle red separator button between the photos and the map.

You can replay all your tracks as slideshow by opening Main Menu and tapping on “Play track as slideshow”. Here you can manually navigate through the track by swiping left/right on the bottom side of the screen. You can also start auto play by double tapping on the lower side of the screen.
To exit slideshow swipe down the on the bottom side of the screen.
To split a track first you need to select the point where you want the split to occur. Then tap on the “edit” (scissors) button and select “Split”, a more clear overview of the change will be displayed, if you are happy with the change tap on the bottom “Split” button.
To trim a track first you need to select the point where you want the trimming to start/end. Then tap on the “edit” (scissors) button and select “Trim”, a more clear overview of the change will be displayed. The portion of the track in red color will be removed, you can change the selected point to be the start or the end of the trim portion by pressing on the “before/after” toggle button at the top. If you are happy with the change tap on the bottom “Trim” button.
To merge two subtracks first you need to select the first/last point in one of the subtracks. Then tap on the “edit” (scissors) button and select “Merge”, a more clear overview of the change will be displayed, if you are happy with the change tap on the bottom “Merge” button.
First select the point where the nearby points will be merged into. Then tap on the “edit” (scissors) button and select “Group nearby points”, a circle will appear, you can change the radius of the circle by dragging it. When you press “Group” every point inside the circle will be merged into the selected point (circle center).

Longpress on the point you want to move and drag it to the desired position. After you release the point if you are unhappy with the new position, for a few seconds you can undo the change by pressing the “undo” button.
Longpress on the start/end point and drag it to the desired position. After you release the point if you want to, you can also offset the time stamp of the point.
Open Main Menu and tap on “Manage offline maps”. Tapping on the top right “download” button will present you the option to download either the map around the currently opened track, or to download the map which is currently visible on your screen.
You can use the offline maps by switching the “Use offline maps” toggle on in Main Menu. Keep in mind that first you will need to download the maps from “Manage offline maps” in Main Menu.
Exporting and importing a track is only possible if you have upgraded to TraceMyTrack PRO . Go to Main Menu and select the option Export track. Choose from the pop-over window the format option TraceMyTrack. A mailing window will appear and you can add the email address in the first field. The track is attached to the email and you can send it to your friends.
Besides .gpx, .kml, .kmz, .csv export and import formats, one new format is available: TraceMyTrack. It was specifically created for users of TraceMyTrack to be able to export tracks and import them on to another iOS device. Tracks can therefore be shared with anybody who has an iOS device and TraceMyTrack PRO installed on it.
When someone sends you an exported track, you can import it to your device by tapping on the attachment icon and by choosing the TraceMyTrack app icon from the app selection window. TraceMyTrack app will open and a dialogue window will ask you if you want to import the track and will also give you the name of the track that you are about to import. You can choose to import it or to cancel the action. Once the track has been imported, you can find it in your Track list, under “Imported Tracks”.
Sie müssen lediglich eines der Batterieprofile auswählen, das für Sie am bequemsten ist. Tippen Sie auf die Menütaste “Aufzeichnungsprofile”, um die fünf Batterieprofiloptionen anzuzeigen, die von 1 bis 5 von der höchsten bis zur niedrigsten Aufzeichnungsgenauigkeit geordnet sind, und wählen Sie das Profil aus, das am besten zu der Art der Aktivität passt, die Sie durchführen.
With the LITE version, you have limited access to TraceMyTrack features. For example, you can only record 5 Tracks and only within 1250 available track points, you can not display info bubbles or can’t auto assign new photos to your track. With the PRO version, you can record as many tracks as you like and there is no limit to the number of points. Only by upgrading to PRO, you can export your track as CSV, GPX, KML (with or without images).
Before we start you will need the following:
– the device where TraceMyTrack is installed
– internet connection
– a computer with iTunes installed
– a data transfer cable (charging cable)
1. Connect the device to iTunes -> select the device, then:
1.a. Select the “Apps” tab
1.b. Scroll down by dragging the rightmost scroll bar, until you reach “File Sharing” title
1.c. in “Apps” list select “TraceMyTrack” and from the right side, copy the folder “logs” and the file “MyTrack2.sqlite” to the computer. If you have both TraceMyTrack Pro and TraceMyTrack Lite installed on the device, then in the app list you will have two identical “TraceMyTrack” apps, and since you can’t know for sure which is the Lite version just copy the Logs and MyTrack2.sqlite from both of them on the computer.
2. Now you need to send us the files you copied to the computer (“MyTrack2.sqlite” file and the “logs” folder), via e-mail (you will probably need to compress the logs folder, before attaching it to the mail).
TraceMyTrack can be used without internet connection, but you need to download the map from the area where you want to create the track in the Main Menu – Manage offline maps, and in the Main Menu you must enable the Use offline maps option. You will only be able to have access to the Help section when you are connected to a WiFi or to your Mobile Data.
Track line
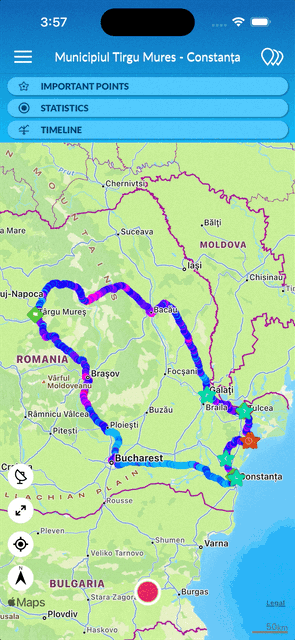
What do the colors mean?
TraceMyTrack is programmed to color your tracks/subtracks depending on your speed. As such, when the speed is 0 or up to 30km/h, the color will be dark red. When the speed is approximately 30km-60km/h, the track/subtrack will go into a lighter red hue. Between 60km-90km/h, the track/subtrack will get magenta hues. As the speed grows, the track will become purple – for the interval 90km – 120km/h – and above this speed, it will get darker hues of blue. Starting with 150km/h and up, the track/subtrack will color into an increasingly lighter blue.
Guide section
If you add guide sections to your track, they will be drawn underneath the track line with a greenish color.
Video section
If you assign a video to a track, TraceMyTrack will highlight the section of the track where the video was taken by drawing a “film strip” underneath the track line.
If a track has guides applied to it, you can remove them by going to main and selecting “Remove guide sections”. If the track doesn’t have any guides applied to it this option will not show up in main menu.

If you want to record a new track but you want to follow a specific path or a track which was recorded by someone else, you can add that track as a guide to your currently opened track. The guide track will be temporarily overlayed on the map beneath your trackline.
You can find all guide tracks in the “Guides tracks” list. Just open the tracks list and select the list “Guide tracks”.
You can create a guide from any track or subtrack. To do so, open tracks list, longpress on the desired track/subtrack and drag it over “CREATE GUIDE TRACK”.
You can view all your guide tracks by selecting “Guide tracks” list at the top.
You can either add a guide track or a normal track to act as a guide on you currently opened track. All you need to do is open the tracklist and longpress on any track and drag it over “ADD AS GUIDE”. The the selected track will be displayed as a green overlay over you currently opened track.
You can begin a new recording directly from a Guide track, and this will automatically use the guide track in the new recording.
To remove the guide overlay, open the Main Menu and tap on “Remove guide sections”. This will remove all the guide overlays that were applied on the currently opened track.
In TraceMyTrack you can place two different types of geofences: a “Point Group” geofence that groups all points which were recoded inside it to a single point in it’s center. and a “End Recording” geofence that ends all recoding as soon as you enter in it’s radius.
To place a “Point Group” geofence, open Main Menu and tap on Geofence, then tap on the plus button and place your geofence. You can increase or decrease the geofence radius by dragging it’s outer ring with the finger. You can also move the geofence to a different position by dragging the red pin located in the middle of the geofence. Once you are happy with it’s position and size tap outside of the geofence to save and close it.
In TraceMyTrack you can place two different types of geofences: a “Point Group” geofence that groups all points which were recoded inside it to a single point in it’s center. and a “End Recording” geofence that ends all recoding as soon as you enter in it’s radius.
To place a “End Recording” geofence, open Main Menu and tap on Geofence, then tap on the plus button and place your geofence, then at the top of the screen toggle the “Geofence type” to “End Recording”. You can increase or decrease the geofence radius by dragging it’s outer ring with the finger. You can also move the geofence to a different position by dragging the red pin located in the middle of the geofence. Once you are happy with it’s position and size tap outside of the geofence to save and close it.
In the Main Menu, you have the option Edit Tags, which opens a list of all your used tags on all your tracks. You can add new tags or delete existing tags by either tapping on the + icon in the left lower corner or the Edit button in the lower right corner, respectively.
If you want to add an address to a point on the map, first you need to select the targeted point. Choose the Add Address icon from the row of point information icons. A full-view list of addresses will show up and you may choose the address you need to add. If you can’t find the address in the list of displayed addresses, tap on ‘Get address for this location’ at the top of the address list. The address will be displayed in the address field, within the edit point details.
If you have a problem, noticed a bug or even if you have a suggestion, you can contact us by opening Main Menu and tap on the “Support” option at the bottom of the menu.
In order for all features of TraceMyTrack to work properly you need to grant certain permissions. You can see an overview of all the permissions you granted TraceMyTrack by opening Main Menu, tap on Settings then Permissions.
